The Cheapest Splashbacks for Kitchens That Actually Last

Cheap splashbacks that last: the short version
A splashback that costs half as much and needs replacing in five years is a deposit on the next one. The cheapest splashbacks for kitchens are the ones that suit the way the kitchen gets used: what's cooking, how hot the wall gets, how much grease lands on it and how often someone is prepared to scrub it.
Price is the easy part. Superior Renovations' kitchen splashback cost guide lists the per-square-metre figures for glass, tile, acrylic, mirrored glass and stainless steel, and it's the page to start from if you want the full price table. The harder question is which low-cost option will still look right, and still be safe, in your kitchen ten years from now.
The trade-offs are the same whether you're refreshing an Auckland splashback on its own or budgeting a full kitchen renovation. The cheapest material can turn into an expensive wall once the cuts are counted. Your cooktop decides which low-cost options are allowed at all. And a few popular shortcuts end up costing more than they save. Further down, a Henderson Valley kitchen shows a tiled splashback that became the showstopper.
What the cheapest splashbacks for kitchens actually cost
These are the starting figures Superior Renovations publishes for the material, supplied. They come straight from our splashback cost guide:
- Tile: from $27 per square metre.
- Stainless steel: from $270 per square metre.
- Glass: from $300 per square metre, and from $400 per square metre for low-iron glass.
- Acrylic: from $430 per square metre.
- Mirrored glass: from $450 per square metre.
- Installation: between $300 and $1,300, depending on the type of splashback, its size and who installs it.
Tile is the cheapest way into a splashback by a very long way. One surprise: acrylic, often sold as the budget alternative to glass, starts higher than glass on these figures. If you'd assumed acrylic was the cheap option, get both priced before deciding.
Bear in mind those numbers are indicative starting points for the material only. They don't include making good the wall once the old splashback comes off, the cut-outs for power points and taps, or the finishing at the edges. The cheapest material and the cheapest finished splashback are often two different answers.
Why the cheapest material rarely gives the cheapest splashback
On a tiled splashback, the tile itself is often the smallest number on the quote. The money sits in setting out, cutting and finishing. Qualified trades in Auckland charge $120 to $150 an hour, so every extra hour a tiler spends around your window reveal shows up in the price. These are the things that move it:
- The number of cuts. Power points, a window reveal, a rangehood surround and a return around a corner each add cutting time. A plain rectangular run is the cheapest thing a tiler can do.
- Tile size and format. Mosaics take longer per square metre than subway tile. Large-format sheets need two people and a very flat wall.
- The wall behind. If it's uneven or damaged when the old splashback comes off, it has to be fixed before anything goes on it.
- The edge detail. How the tile finishes at the end of a run, under the wall cabinets and at the benchtop is what separates a tidy splashback from an obviously DIY one.
Glass works the other way round. It's templated against the finished benchtop and cabinetry, cut, has every cut-out machined in, then toughened. Once it's toughened, it can't be cut, drilled or altered. Move a power point after the glass is made and you're paying for a new panel. That's the hidden cost with glass: it's cheap to live with and expensive to change your mind about.
Put the cheapest tile on a wall with six power points, a window and a corner return, and you can still end up with an expensive splashback. Before you pick the material, count the cuts on your wall.
Choosing splashbacks for kitchens in NZ by how you cook
The way to find a splashback that lasts is to stop thinking about the wall as one surface. A kitchen wall has zones, and each one takes a different kind of punishment. Pick for the harshest zone first, then decide whether the rest of the wall needs the same material.
Behind a gas cooktop
This is the zone that rules options out. Acrylic can't go behind or near a cooktop unprotected. If you want acrylic in that spot, Superior Renovations' guidance is to put a stainless-steel plate or toughened glass behind the burners. Mirrored glass isn't automatically safety glass either, so only a toughened mirrored panel rated for use behind a cooktop belongs there.
The low-cost choices that handle the heat are stainless steel, toughened glass and porcelain tile. Porcelain is denser and less absorbent than standard ceramic, which makes it the safer tile choice behind the burners. The appliance manufacturer and the gas standards set the clearance between a gas burner and the wall, so have your gasfitter confirm it for your specific cooktop before the splashback is set out.
Behind an induction or electric cooktop
Induction heats the pan rather than an open flame, so far less heat reaches the wall and the list of workable materials gets longer. You still need to follow the clearances in the appliance documentation. For most induction kitchens, the harder test is grease and cleaning rather than heat, which is where the glaze and grout decisions below come in.
Behind the sink
The sink run takes water and detergent, not heat. That's where ceramic tile earns its place. It's usually cheaper than porcelain and perfectly serviceable on a wall that isn't taking direct heat and splatter. Mosaic and penny-round tiles look great behind a sink, and they're hard work behind a gas burner.
The heavy-cooking kitchen
If someone in your house fries, woks or cooks from scratch every night, grease is the enemy. A smooth gloss or satin glaze wipes clean; a textured or matte tile holds cooking grease no matter what it cost.
Grout is the other weak point. Standard cement grout is porous, so on a splashback it soaks up oil and discolours in exactly the spots you look at most, behind the burners and around the rangehood. Epoxy grout is non-porous and doesn't, and across a splashback-sized area the extra material cost is small. Our side-by-side on epoxy and cement grout sets out the difference in price and colours. Expect a tiler to charge a little more to lay it, because epoxy has a short working time.
The rental or the kitchen you're selling
If the kitchen needs to look tidy for the next few years rather than the next twenty, a plain run of white ceramic subway tile with epoxy grout behind the cooktop is hard to beat on cost. Keep the pattern simple, keep the cuts down and put the budget into a clean finish at the edges.
Low-cost tile that doesn't look low-cost
Tile sits at the bottom of the price range, and it also has the widest range of looks. That's the opportunity. Most of what makes a tiled splashback look expensive is how it's laid out and lit, not what the tile cost.
- Subway tile (typically 75 × 150mm or 100 × 200mm) changes character completely depending on whether it's stacked, half-offset or laid vertically. It also has more grout joints than anything else, so the grout choice matters most here.
- Large-format porcelain gives the fewest joints, often a single sheet behind the cooktop, and gets closest to the clean look of glass. It needs a flat wall and a tiler comfortable with big sheets.
- Marble-look porcelain gives the veined look of stone at a fraction of the price, and unlike real marble it won't etch when lemon juice or vinegar lands on it.
- Handmade-look and zellige tiles are best as a feature run rather than wall to wall in a busy kitchen, because the irregular surface traps more than a flat glaze.
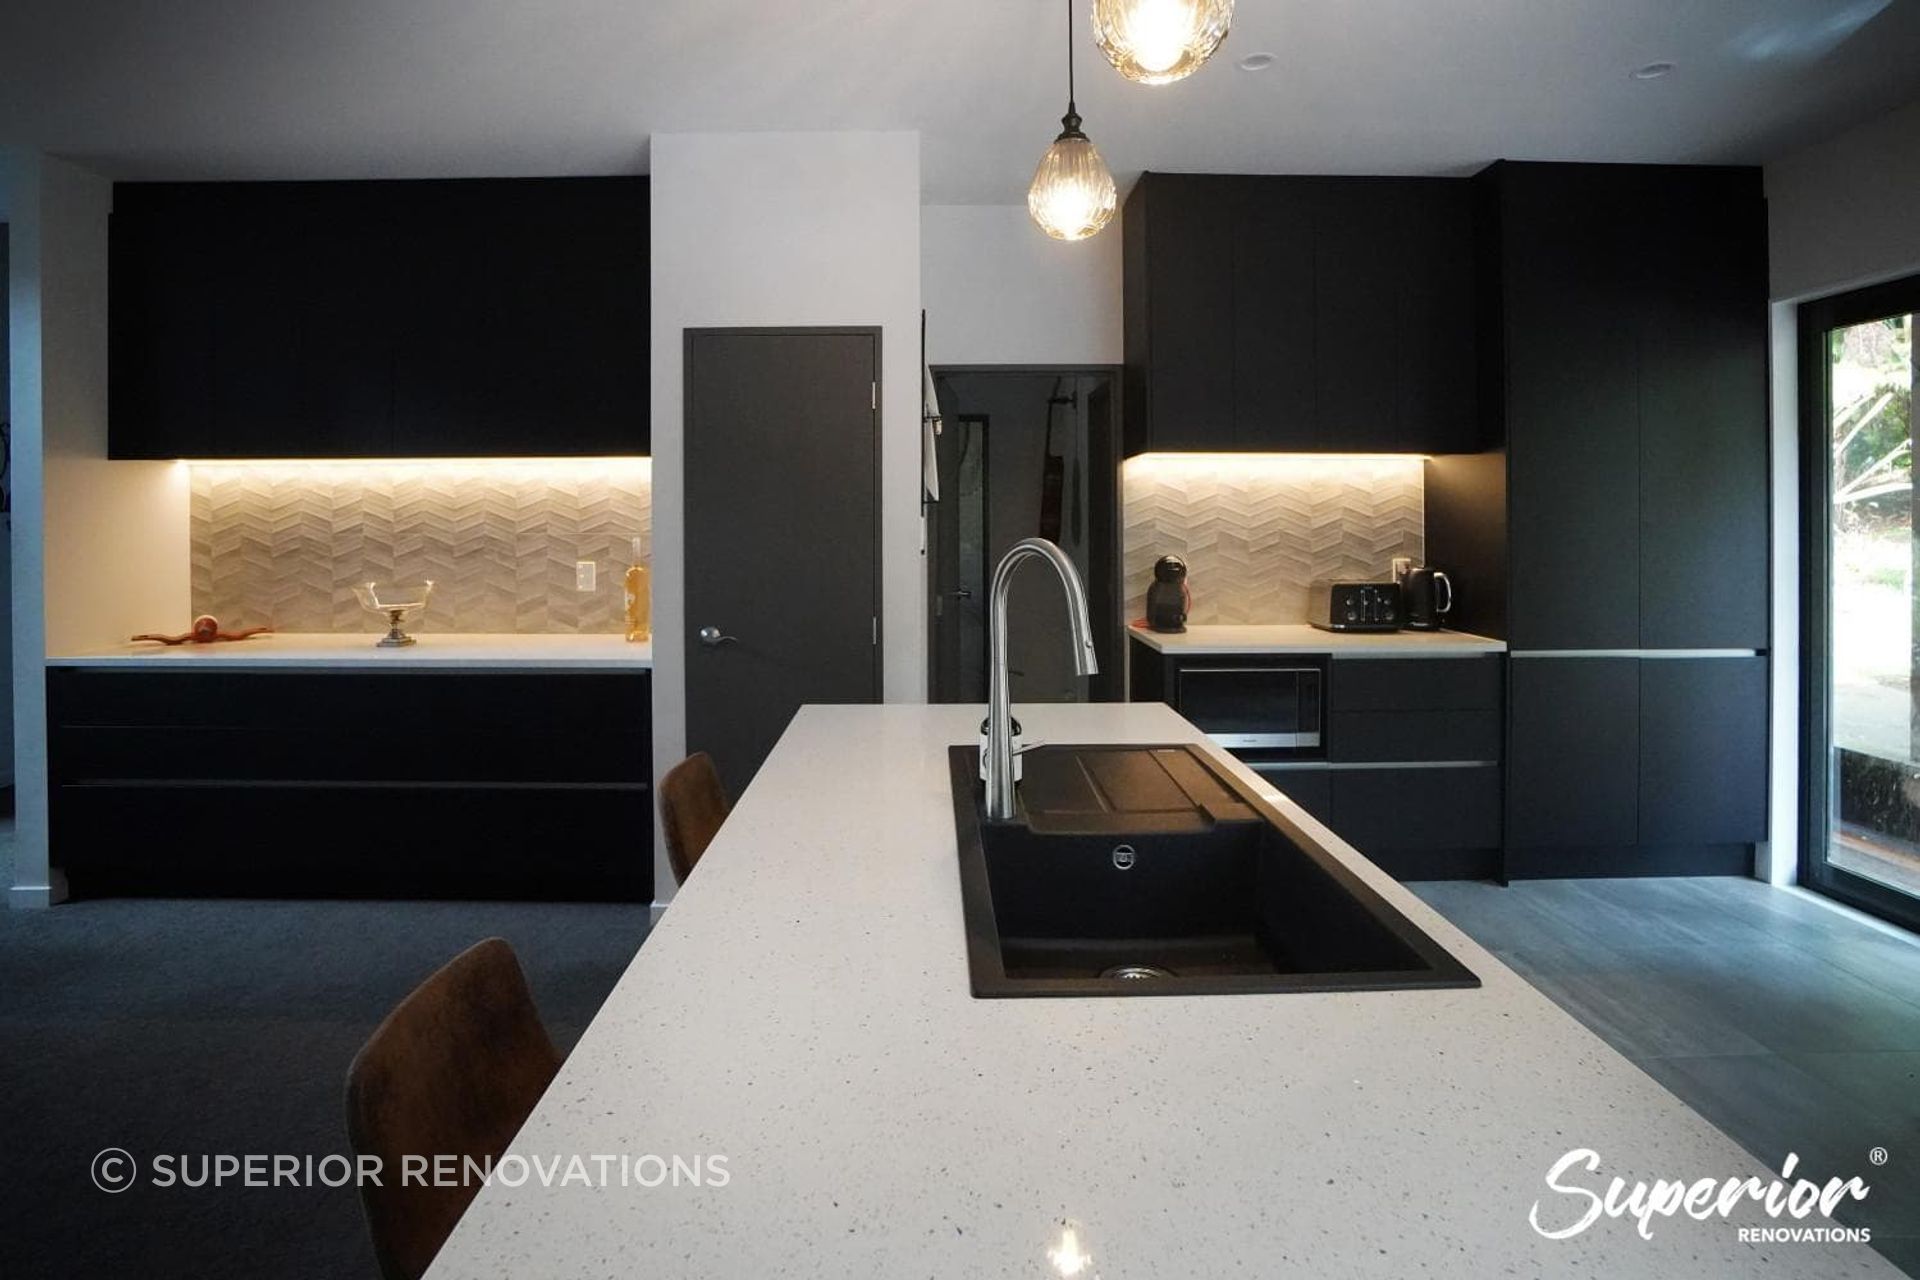
Two free upgrades lift a budget tile. First, set the tile out from the centreline of the cooktop, not from the corner of the room, so full tiles land where everyone looks and the cut slivers end up out of sight. Second, light it. An LED strip under the wall cabinets washes across the tile and doubles as task lighting.
When people ask for the cheapest splashback, they usually mean the one they won't have to think about again. Our designers would rather put a plain tile on the wall with epoxy grout behind the cooktop than a fancier tile with grout that's grey in two years. Spend where the grease lands, save everywhere else.
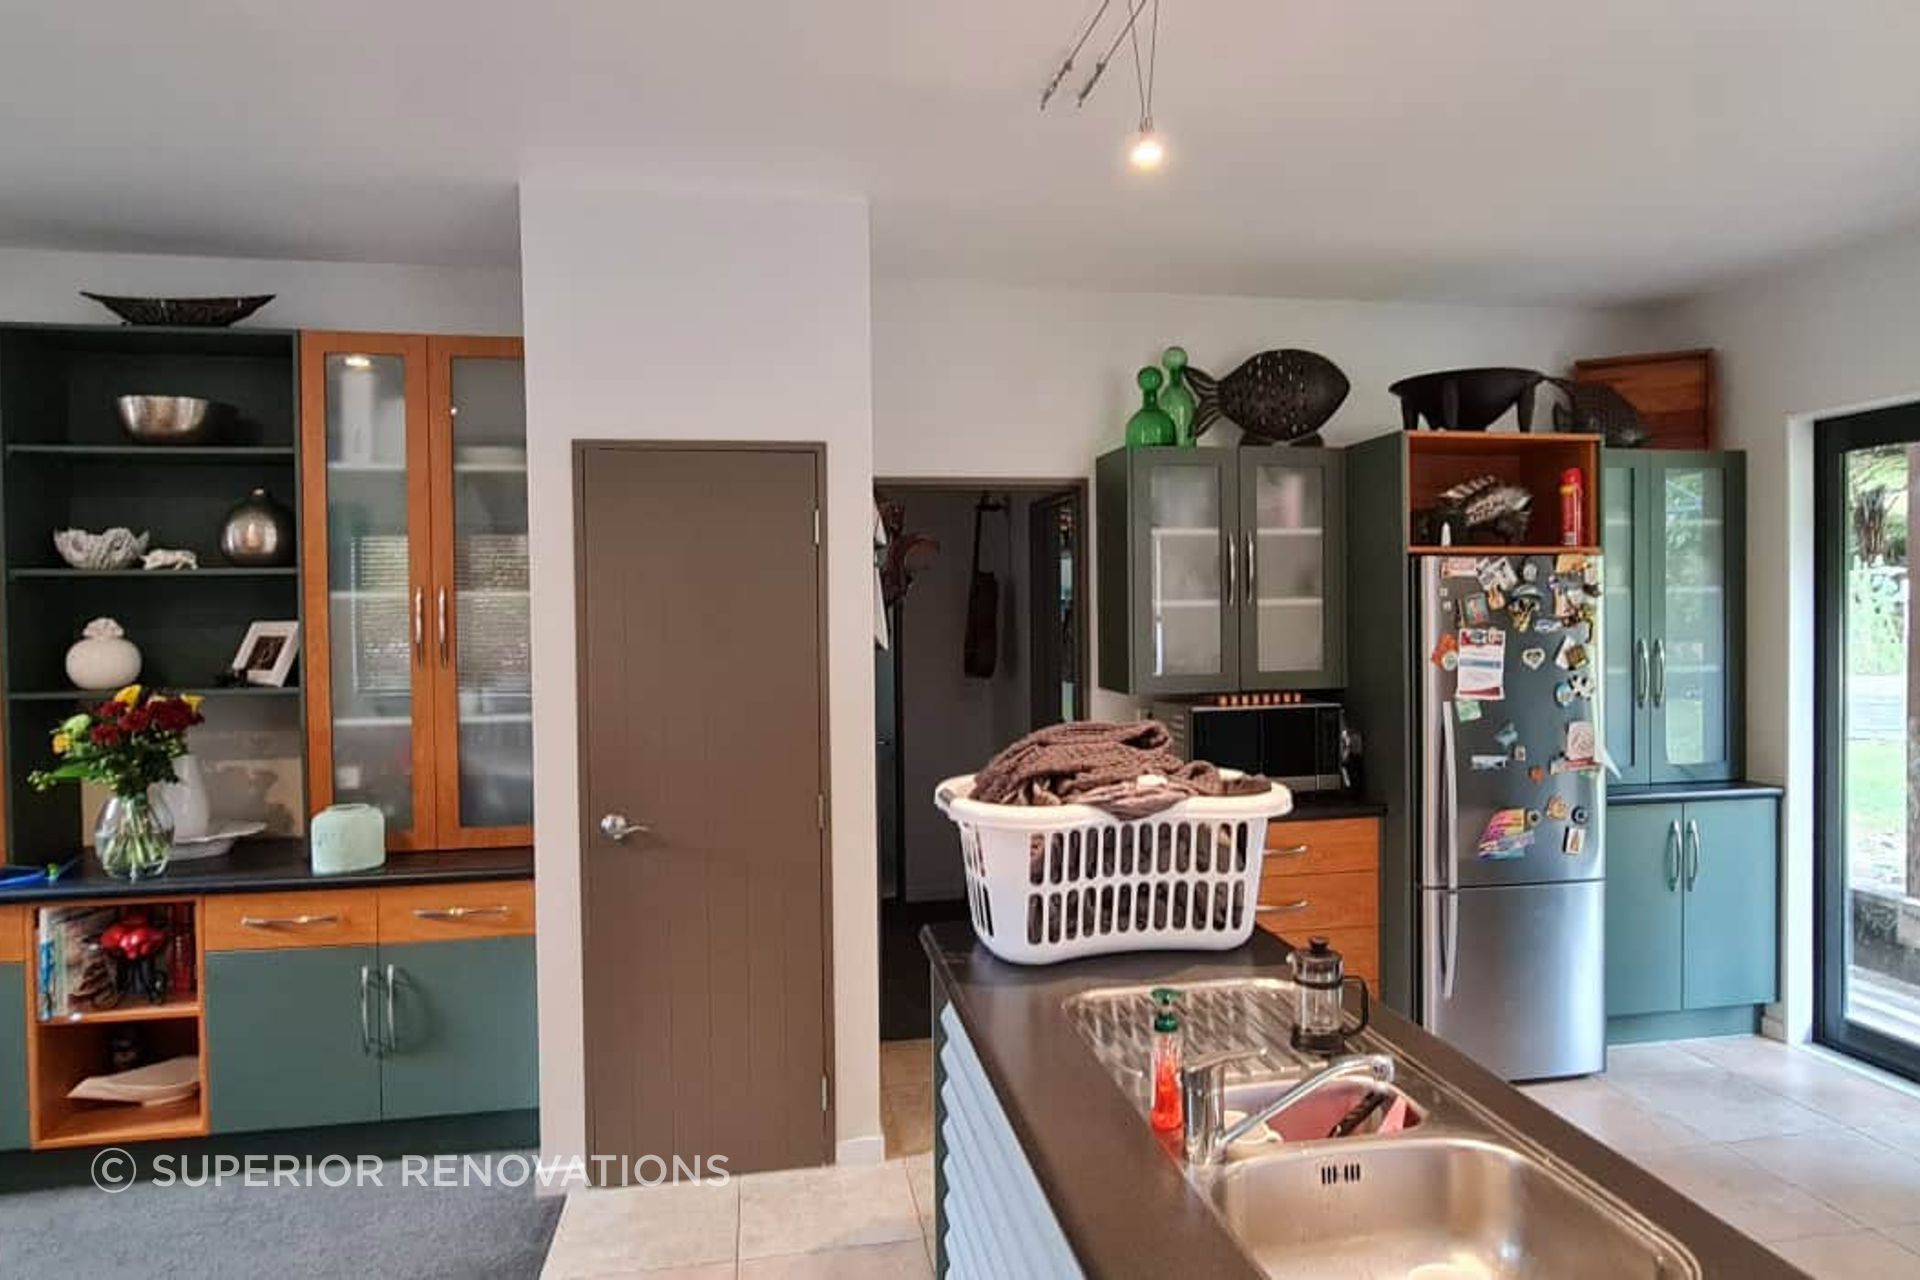
You can see the lighting trick in a black-and-oak kitchen renovation in Henderson Valley. The family had lived with a 1990s kitchen and its green vinyl cabinet fronts for 15 years, and the owner had always assumed she'd end up with subway tiles. Our project manager steered her towards a Tile Depot Art Stone Chevron tile in grey, 300 × 800mm, chosen to pick up the grey and black flecks in the 30mm engineered-stone benchtop. LED strips under the cabinets wash light across it, and the owner says they've had so many comments about those tiles. The photos below show the kitchen before (left) and after (right).
Cheap splashback shortcuts that cost more later
Some savings are real. These ones usually aren't.
Tiling over the old splashback
It's sometimes possible, and it's rarely a good idea. Tiling over existing tile pushes the finished face forward, which changes how it meets the benchtop and the underside of the wall cabinets, and it hides whatever state the original wall is in. A glass panel over flat, sound tile can work. In a full kitchen renovation the old splashback comes off anyway, because the cabinetry and benchtop are being replaced.
Choosing the splashback before the rangehood
The rangehood sets the top of the splashback behind the cooktop, so its width and mounting height have to be settled before anything is measured. It isn't optional either. New Zealand's Building Code Acceptable Solution G4/AS1 calls for mechanical extraction of at least 50 litres per second for cooktops, and BRANZ's Level guide notes that natural ventilation on its own isn't enough to remove cooktop moisture. A recirculating rangehood that returns air to the room leaves that moisture in the kitchen, which is what turns grout grey and the paint above the splashback patchy. Duct it outside if the layout allows, and confirm the extraction requirement for your kitchen with your designer or a Licensed Building Practitioner.
Painting the wall instead
Paint is the cheapest finish you can put on a wall, and it isn't a splashback. Behind a cooktop or sink it takes the grease and water the splashback exists to stop. It has a place above the splashback line, not below it.
Getting the height wrong
The usual run is from the benchtop to the underside of the wall cabinets, commonly around 600mm, with a taller panel behind a freestanding cooker or where there are no overhead cabinets. Our guide to the measurements that set splashback height covers the bench heights and clearances behind that number. If you're weighing a full-height splashback against a standard run, Little Giant Interiors has 20 kitchen splashback ideas from Little Giant Interiors' designers, including where full height is worth it.
Where the splashback sits in a kitchen renovation budget
On a splashback-only job, the material and installation figures above are most of the story. Inside a kitchen renovation, the splashback is one line in a much bigger number. Superior Renovations publishes $26,000 to $35,000 for a mid-range kitchen renovation in Auckland. Against that total, epoxy grout behind the cooktop is a small line item. The place a splashback blows a budget is sequencing: glass that's templated before the benchtop is final, a power point that moves after the panel is made, or a tiler booked before the electrician has finished.
That's why the splashback sits near the end of the programme. Glass can't be templated until the benchtop is in and the cabinetry is fixed. Tile is slower to lay but forgiving, because it's cut on site and a change on the day costs minutes rather than a remake. When the cabinetmaker, electrician, plumber, glazier and tiler are all one team's problem, those clashes get sorted before they reach your wall. It's one of the reasons Superior Renovations runs a kitchen from design through to installation with one project manager.
If you want a sense of where your whole kitchen will land before choosing materials, rough out your kitchen in our online cost calculator first, then decide where the splashback budget goes.
Cheapest kitchen splashback FAQs
What is the cheapest splashback option in NZ?
Tile. Superior Renovations' published figures start tile from $27 per square metre, against $270 for stainless steel, $300 for glass, $430 for acrylic and $450 for mirrored glass. Those are material prices only. Cuts, wall preparation and edge finishing decide the installed price, and installation runs $300 to $1,300.
What is the cheapest way to do a splashback that lasts?
A plain rectangular run of glazed ceramic or porcelain tile, set out from the cooktop centreline, with epoxy grout behind the cooktop. Keep the cut-outs to a minimum, choose a gloss or satin glaze rather than matte, and make sure a ducted rangehood is taking the moisture out of the kitchen.
Can you put acrylic behind a gas cooktop?
No. Acrylic can't be installed behind or near a cooktop without protection such as a stainless-steel plate or toughened glass behind the burners. For the cooktop zone, stainless steel, toughened glass and porcelain tile are the low-cost options that handle heat. Your gasfitter should confirm the clearance for your specific cooktop.
What splashback is easiest to keep clean?
A single sheet of toughened glass, because there are no joints for grease to sit in. After that, large-format porcelain with a gloss or satin glaze and epoxy grout. Heavily textured or matte tiles and small mosaics are the hardest to keep clean, because they multiply the surface and the joints right where cooking grease lands.
If you're planning a new splashback as part of a bigger kitchen change, you'll find our kitchen projects and pricing guides on superiorrenovations.co.nz. Or see the tiles and benchtops side by side at our showroom at 16B Link Drive, Wairau Valley, where our design team can talk you through which options suit the way you cook. Book a free kitchen consultation with our designers, and bring a photo of your current splashback and your cooktop model.