How To Drill Holes For Cabinet Handles

Refreshing your kitchen or bathroom with new cabinet handles is a fantastic way to update your space without a complete renovation. This simple DIY project can dramatically change the look and feel of a room. However, drilling holes for cabinet handles can be intimidating if you’re unfamiliar with the process.
In this guide, we’ll walk you through how to drill holes for cabinet handles, ensuring precise, safe and efficient installation. We’ll also explore the diverse range of handles available at KT&CO’s store, helping you find the perfect match for your cabinetry.
Selecting The Right Handles
Before learning how to drill cabinet handles, some preparations need to be made before putting a permanent hole in the wood. The first step in this process is choosing the right handles for your cabinets. This decision is influenced by several factors:
- Style — Consider the overall aesthetic of your room. Are you aiming for a modern, minimalist look, or is your space more traditional? The style of the handle should complement the room’s decor.
- Functionality — Think about how often the cabinets are used and who will be using them. Ergonomically designed handles are essential for high-usage areas.
- Finish and Material — The material and finish of the handles can make a significant impact. Brass, stainless steel and chrome are popular choices, each offering a distinct look.
- Size — Handles come in various lengths and sizes. It’s important to choose a size that is proportional to your cabinet size.
KT&CO prides itself on offering a wide variety of cabinet handles. From sleek, contemporary kitchen drawer handles to brass handles and charming vintage handles, our collection caters to all tastes and needs, ensuring you find the perfect hardware to complement your cabinets.
Essential Tools And Materials
A successful installation requires the right set of tools. By having all the right equipment ready on-hand, the drilling and handle installation can proceed uninterrupted. Here’s what you’ll need:
- Power Drill — A reliable power drill is essential for creating clean, precise holes.
- Measuring Tape — Precision is key, and a measuring tape will help you determine the exact placement of your handles.
- Pencil — To mark drilling spots accurately.
- Level — Ensures that your handles are perfectly horizontal or vertical.
- Masking Tape — Prevents the wood from splintering when drilling and provides a visible marking area.
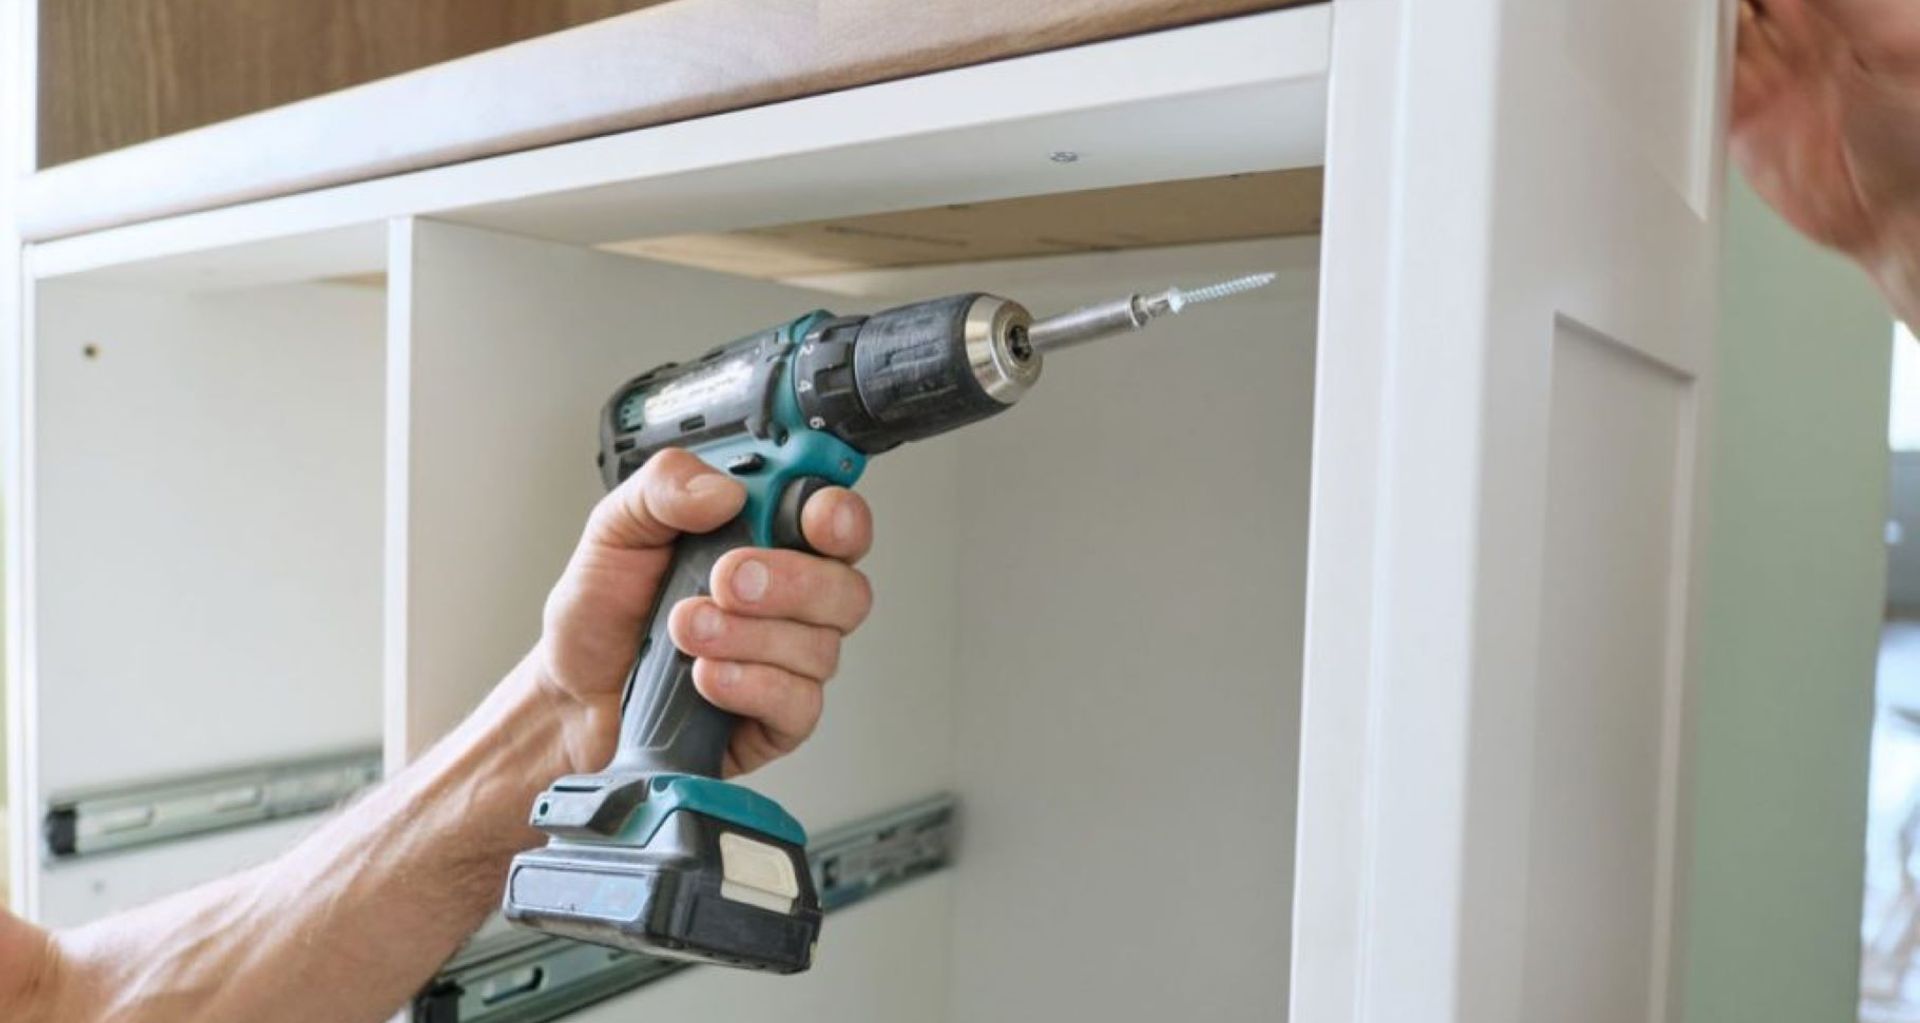
Step-By-Step Drill Guide For Cabinet Handles
Once you have chosen your preferred handles and assembled all the necessary equipment, you should be ready to proceed. Here’s how you drill holes for cabinet handles:
- Measuring and marking — For door cabinets, decide on the placement of the handles – top, bottom or centre. For drawers, centring the handles is usually the norm.
Getting the size and measurements right is crucial for the aesthetic and functional success of your handle installation. For handles with multiple screws, measure the distance between the screw holes. If you’re replacing existing handles, use their measurements as a guide. For new installations, standard practice places drawer handles in the centre of the drawer front, and door handles 6 to 8 centimetres from the top or bottom edge of the door.Once you’ve measured, use a pencil to mark the drilling spots. A level is crucial here to ensure alignment. - Drilling — Before drilling, place a piece of masking tape over your pencil mark. This prevents splintering and makes the mark more visible. Choose a drill bit that corresponds to the size of your handle screws. Drill slowly to avoid damaging the cabinet, and gradually increase your drill speed as needed. If you’re looking to drill all the way through, stop once you no longer feel resistance or if you can see the drill bit appear on the other side.
Be sure to turn off and unplug the drill afterwards to avoid accidents. - Installing the handles — Once you’ve drilled your holes in the cabinet, remove the masking tape and position the handle against the holes and use a screwdriver to secure the handle in place. Be cautious not to over-tighten, as this can strip the screw or damage the cabinet.After installing all the handles, take a step back to inspect your work. Make any necessary adjustments to ensure all handles are perfectly aligned. Clean any debris or sawdust from the drilling process, and admire the transformation of your cabinets.After installing all the handles, take a step back to inspect your work. Make any necessary adjustments to ensure all handles are perfectly aligned. Clean any debris or sawdust from the drilling process, and admire the transformation of your cabinets.
Looking For Stylish And Durable Handles? Turn To KT&CO
Drilling holes for cabinet handles can be a straightforward DIY project with the right preparation and tools. By following this drill guide for cabinet handles, you can achieve a professional-looking finish, enhancing the overall look of your cabinets. To ensure all your hard work is worth it, be sure to explore KT&CO’s extensive range of high-quality cabinet handles to find the ideal hardware for your space.
KT&CO specialises in providing a variety of kitchen cabinet handles for the benefit of Australian spaces. Our collection includes ergonomic lip pulls, kitchen knobs, modern black handles and so much more in various sizes, styles and colours.
Shop online with the utmost convenience and take advantage of our Australia-wide delivery as well as a 12-month warranty on all products for added peace of mind. Discover the perfect cabinet handles to complete your kitchen at KT&CO today.